Love this? Save it for later!
Share the inspiration with your friends
“You gotta press it down,” my buddy said, smirking with a spatula in hand. That evening, I was skeptical—would smashing a burger really lock in the juiciness? Honestly, I figured it was just another cooking fad, one of those tricks people swear by but never quite works when you try it yourself. Still, curiosity won over, and I gave it a shot. The sizzle as the patty hit the hot griddle was different—more intense, almost urgent. Moments later, the aroma pulled me in like a magnet: smoky, rich, and undeniably mouthwatering.
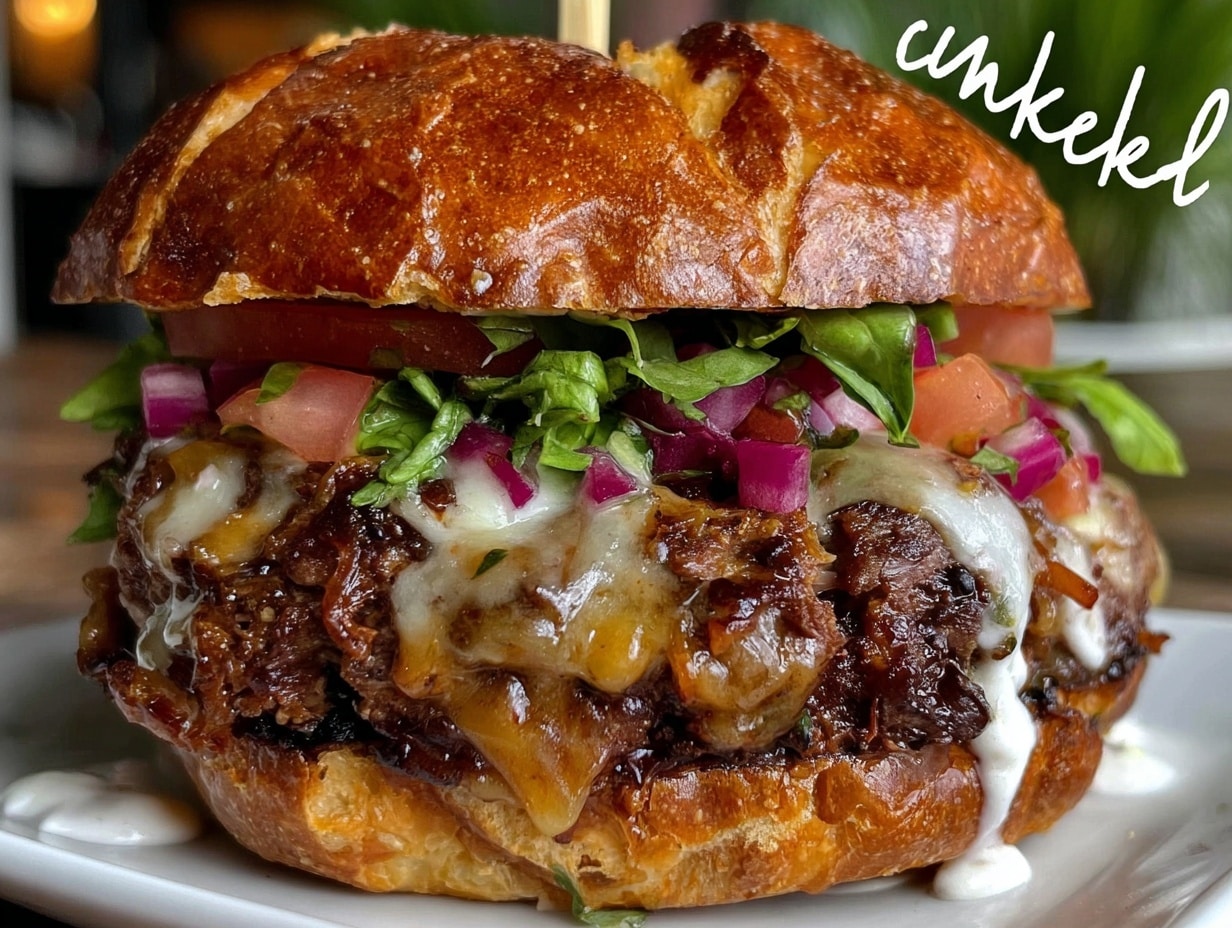
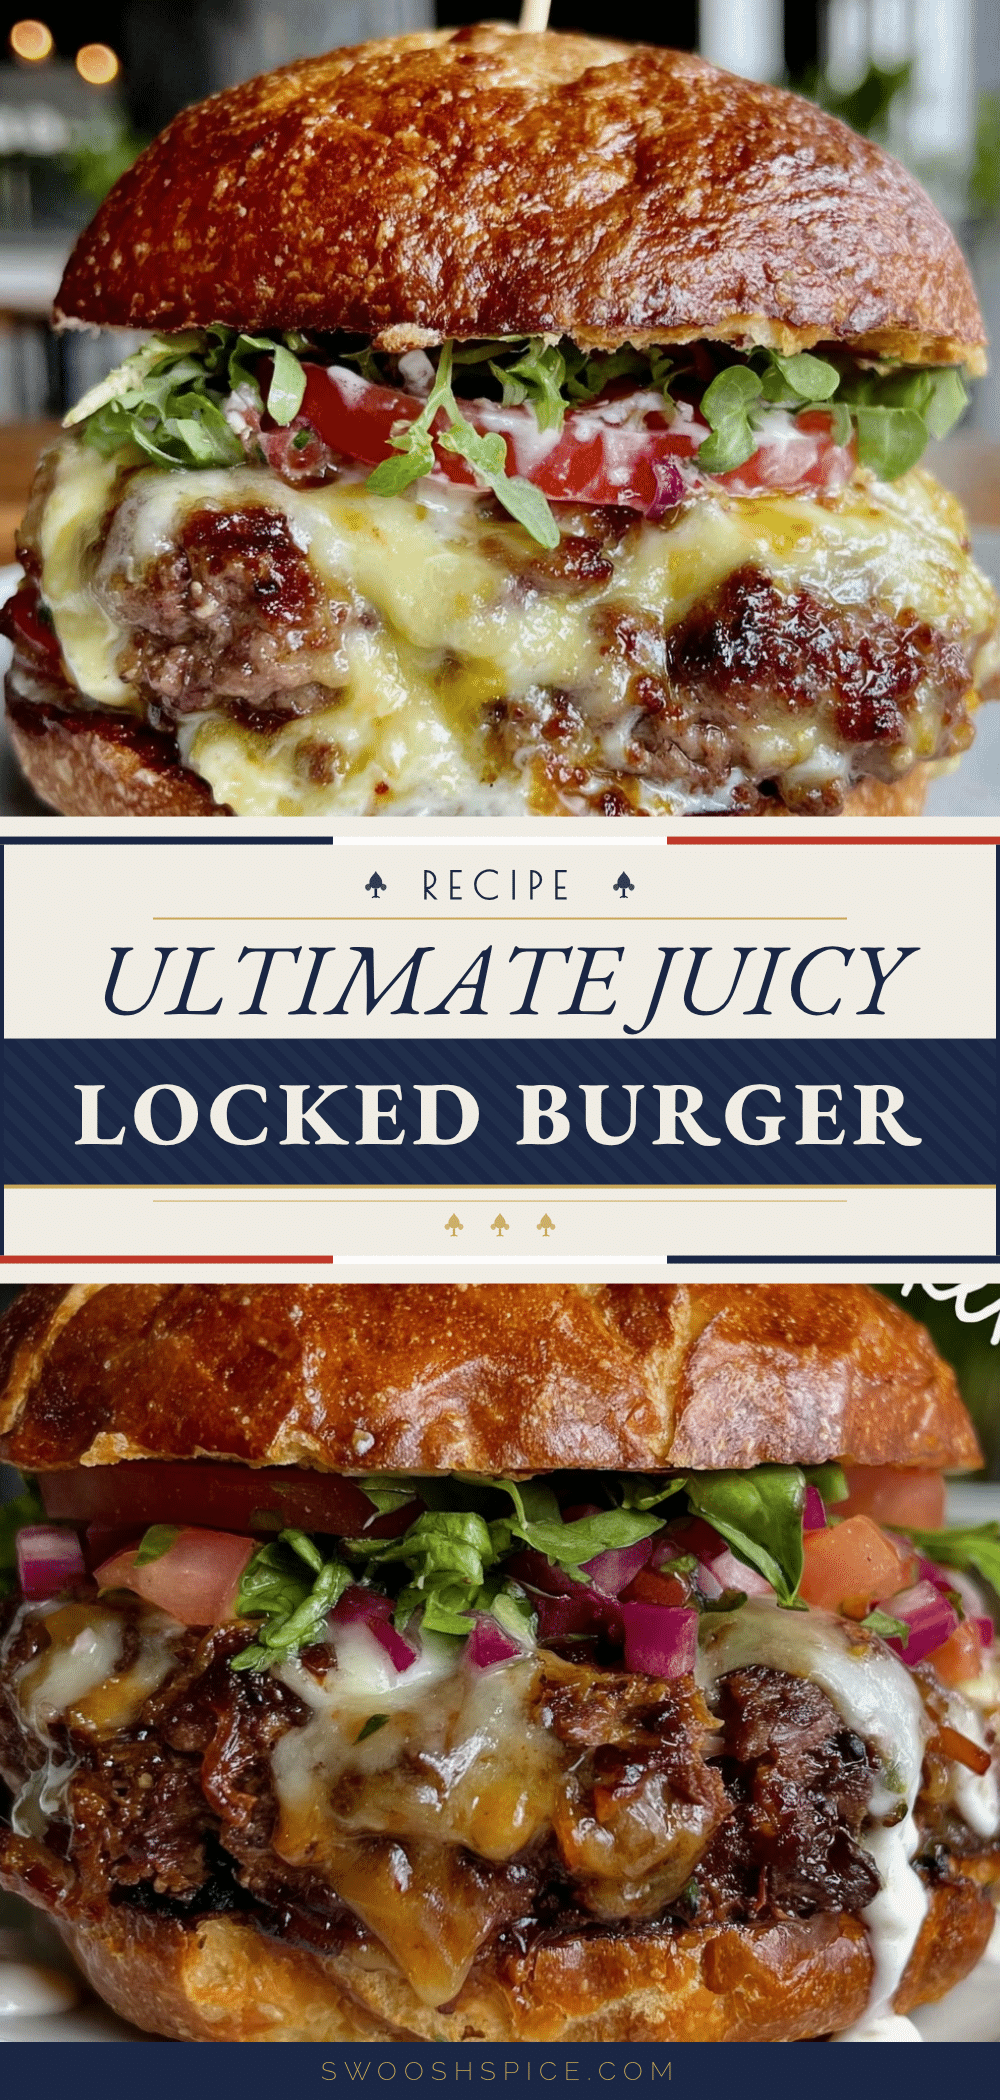
When I bit into that first “juicy locked” burger, my doubts melted away faster than the melted cheddar. The crust was perfectly caramelized, and inside, the meat stayed tender and bursting with flavor. It wasn’t just juicy; it was a revelation. After making this recipe multiple times that week (yes, I admit it—I was obsessed), I realized this technique and ingredient combo turns even the simplest homemade burger into something special.
There’s something quietly satisfying about mastering a burger that doesn’t dry out, even when you’re juggling a busy night or unplanned guests. That evening, as I wiped a smear of sauce from the corner of my mouth, I knew this was more than just a recipe—it was a reliable way to bring a little magic to everyday meals. And that’s why this Ultimate Juicy Locked Burger Recipe stuck with me. It’s about making each bite count, every single time.
Why You’ll Love This Recipe
After countless trials and a few charred experiments, I’ve nailed a burger method that’s foolproof, juicy, and packed with flavor. This recipe isn’t just a quick fix; it’s tested to give consistent, crave-worthy results. Here’s why it’s earned a permanent spot in my meal rotation:
- Quick & Easy: From mixing to plating, this burger comes together in about 25 minutes—ideal for busy weeknights or spontaneous cookouts.
- Simple Ingredients: No need for exotic spices or hard-to-find items. Most of these are kitchen staples you probably already have.
- Perfect for Any Occasion: Whether it’s a casual family dinner or impressing friends at a backyard gathering, this burger fits the bill.
- Crowd-Pleaser: Kids, adults, meat lovers, and burger newbies alike give it thumbs-up every time.
- Unbelievably Delicious: The secret “locked” juiciness comes from a clever technique and a blend of beef cuts that create a flavor-packed, tender bite.
This recipe stands apart because of its smart balance—using a mix of ground chuck and brisket for fat content, plus a quick press that builds a crispy crust without squeezing all the juices out. If you’re used to dry burgers or uneven cooking, this method changes the game. Honestly, it’s the kind of burger that makes you close your eyes after the first bite and just savor the moment.
What Ingredients You Will Need
This Ultimate Juicy Locked Burger Recipe relies on straightforward, quality ingredients that combine for maximum flavor and texture without fuss. Here’s what you’ll need:
- Ground Beef Blend: 1 pound (450g) of 80/20 ground chuck and brisket mix (this fat ratio is key for juicy results)
- Salt & Pepper: Kosher salt and freshly ground black pepper, for seasoning the patties just before cooking
- Cheese Slices: Sharp cheddar or American cheese, optional but highly recommended (adds melty richness)
- Burger Buns: Soft brioche buns or potato rolls (something with a bit of sweetness complements the beef perfectly)
- Butter: 2 tablespoons, softened, for toasting buns (adds a golden, crispy finish)
- Condiments and Toppings: Classic picks include lettuce, tomato slices, pickles, red onion rings, and your favorite burger sauce or mayo
For best results, I recommend using freshly ground beef from a trusted butcher or a reputable brand like Pat LaFrieda if you can find it. Avoid pre-packed supermarket beef with additives; it just won’t lock in juices the same way. If you want a twist, swap the regular buns for soft homemade bagels for a different but delicious texture.
Vegetarian or alternative diets? You can try plant-based ground patties, but the juiciness won’t be quite the same—though tasty in their own right.
Equipment Needed
To get that perfect juicy locked burger texture, having the right tools helps a lot, though you don’t need anything fancy.
- Cast Iron Skillet or Heavy-Duty Griddle: A cast iron pan holds and distributes heat evenly, which is crucial for getting that great crust.
- Spatula: A sturdy, flat spatula for pressing the patties gently and flipping without breaking them.
- Kitchen Scale (optional): Handy if you want perfectly portioned patties every time (about 4 to 5 ounces / 115-140g per patty).
- Mixing Bowl: For gently combining the ground beef and seasoning.
- Thermometer (optional): To check doneness if you prefer precise cooking, aiming for 160°F (71°C) for safety.
If you don’t have a cast iron skillet, a heavy non-stick pan will work, but you might miss out on some of the crust’s depth. I’ve used a budget-friendly Lodge skillet for years, and it’s been rock solid—easy to clean and almost impossible to mess up.
Preparation Method
- Divide and Shape the Beef: Place 1 pound (450g) of ground beef into your mixing bowl. Gently divide into 4 equal portions (~113g each). Lightly shape each into a loose ball—don’t overwork the meat or the texture will get tough. (About 5 minutes)
- Preheat the Skillet: Heat your cast iron skillet over medium-high heat for 5 minutes. You want it hot enough to hear a sizzle but not smoking.
- Press Patties: Place one beef ball onto the skillet. Using your spatula, firmly press it down into a thin patty about ¼ inch (6mm) thick. This is the “locked” part that creates a crust quickly while sealing juices inside. Repeat with remaining balls, cooking 2 at a time if your pan is smaller. (2 minutes per patty)
- Season Immediately: Sprinkle kosher salt and freshly cracked black pepper on top right after pressing. This prevents the seasoning from drawing moisture out too early.
- Cook Without Moving: Let the patty cook undisturbed for 2-3 minutes until the edges crisp up and the bottom develops a deep brown crust. You’ll see juices pooling on top—that’s your cue.
- Flip and Add Cheese: Carefully flip the patty. If you want cheese, add a slice immediately after flipping so it can melt. Cook for another 1-2 minutes for medium doneness. (Adjust timing for your preferred doneness)
- Toast the Buns: While the second side cooks, butter your buns lightly and toast them cut-side down in a separate pan or oven for golden crispiness.
- Assemble and Serve: Place the cooked patties on the toasted buns and add your favorite toppings and condiments. (Total cook time about 10 minutes)
Quick tip: Don’t press down on the patties while cooking beyond the initial smash; squeezing during cooking squeezes out precious juices. Also, if juices pool too heavily on the patty surface, dab gently with a paper towel to avoid steaming instead of searing.
Cooking Tips & Techniques
Cooking the ultimate juicy burger is part art, part science. Here are some nuggets I’ve picked up through trial and error:
- Use Fatty Beef: A blend with 20% fat is non-negotiable for juiciness. Lean beef dries out quickly and lacks flavor.
- Don’t Overwork Meat: Handle ground beef as little as possible when forming patties. Overmixing packs the meat tight and results in a dense, tough burger.
- Hot Pan, Quick Sear: High heat instantly caramelizes the surface, creating a flavor-packed crust that holds in juices.
- Smash Once: The initial press is key. Resist the urge to press down repeatedly—this only squeezes out moisture.
- Rest Briefly: Let the burger rest 2-3 minutes off heat before assembling. The juices redistribute, so every bite stays moist.
- Multitask with Toasting: Toast your buns while the patties cook to save time and ensure everything’s hot and ready together.
One personal lesson: I once pressed down too hard halfway through cooking, thinking it’d speed things up. The burger turned into a dry hockey puck—lesson learned the hard way! These tips really lock in the juiciness and keep the texture just right.
Variations & Adaptations
There’s room to make this burger your own, whether you’re tweaking for flavor or dietary needs.
- Spicy Kick: Mix a teaspoon of smoked paprika or cayenne into the beef before shaping for a subtle heat boost.
- Cheese Variations: Swap cheddar for pepper jack, blue cheese crumbles, or even a slice of creamy brie to change the flavor profile.
- Gluten-Free Option: Use gluten-free buns or lettuce wraps to keep it bun-free without losing the juicy experience.
- Alternative Cooking: You can cook these smashed patties on a grill pan or outdoor grill using a metal press if you have one; just watch the timing closely as grills vary in heat.
- Plant-Based Twist: For a vegetarian version, try a firm veggie burger patty smashed similarly, though the juiciness will differ. Adding sautéed mushrooms helps add moisture.
I once experimented by adding caramelized onions right into the mix before pressing—surprisingly tasty but a little messier to handle!
Serving & Storage Suggestions
Serve your Ultimate Juicy Locked Burger fresh and hot for the best experience. The toasted bun and melted cheese contrast beautifully with the tender patty. I like to pair mine with crispy fries or a fresh slaw for balance.
If you have leftovers, wrap the patties tightly in foil and store in the fridge for up to 2 days. To reheat, gently warm in a skillet over medium-low heat to maintain juiciness, avoiding the microwave which can dry it out.
Buns can be stored separately at room temperature or lightly toasted again before serving. Flavors actually deepen a bit after resting overnight in the fridge, so if you’re prepping ahead, that can be a bonus.
For a fun side, try serving alongside a light salad or even something sweet like the fresh strawberry yogurt bites to balance savory richness.
Nutritional Information & Benefits
This burger packs a solid protein punch with roughly 500-600 calories per serving, depending on toppings and bun choices. The beef blend provides essential iron, zinc, and B vitamins, supporting energy and immune health.
Using a mix of chuck and brisket ensures fat content keeps things juicy without going overboard. Opting for whole grain or gluten-free buns can add fiber or accommodate sensitivities.
Be mindful that cheese and butter add saturated fats, so balance with fresh veggies or lighter sides. For a health-conscious approach, swapping mayo for avocado or mustard can cut calories while adding flavor.
Overall, this recipe offers a satisfying meal that feels indulgent but can fit into a balanced diet if paired thoughtfully.
Conclusion
If you’re tired of dry burgers or just want a reliable way to impress with a homemade meal, this Ultimate Juicy Locked Burger Recipe has you covered. It’s simple, quick, and rewards you with juicy, flavorful patties every single time. The one-and-done pressing technique and thoughtful beef blend make all the difference.
Feel free to play around with toppings and seasonings to make it truly yours. For me, this burger is about capturing that perfect balance between comfort and flavor — the kind that keeps friends asking for seconds and makes weeknight dinners feel a little special. I hope it becomes a favorite in your kitchen, too.
When you try it, I’d love to hear how you customized your burger or what sides you served alongside it. Sharing those little tweaks is what keeps the joy of cooking alive for all of us!
Frequently Asked Questions
- Can I use lean ground beef for this recipe?
Lean beef tends to dry out quickly; using 80/20 fat ratio is best to keep the burger juicy. - Why do I need to press the burger down?
Pressing creates a crispy crust that seals juices inside, preventing dryness. - How do I know when my burger is cooked perfectly?
Look for a deep brown crust and juices pooling on top before flipping; internal temp of 160°F (71°C) is safe. - Can I make the patties ahead of time?
You can shape patties and refrigerate for a few hours, but press and cook just before serving. - What are some good sides to serve with this burger?
Classic fries, coleslaw, or a fresh salad work great; for something different, try honey paprika chicken for a hearty companion dish.
Pin This Recipe!
Ultimate Juicy Locked Burger Recipe

A foolproof method to make juicy, flavorful homemade burgers with a perfect caramelized crust using a blend of ground chuck and brisket and a unique pressing technique.
- Prep Time: 10 minutes
- Cook Time: 15 minutes
- Total Time: 25 minutes
- Yield: 4 servings 1x
- Category: Main Course
- Cuisine: American
Ingredients
- 1 pound (450g) 80/20 ground chuck and brisket blend
- Kosher salt, to taste
- Freshly ground black pepper, to taste
- Cheese slices (sharp cheddar or American), optional
- 2 tablespoons softened butter, for toasting buns
- Burger buns (soft brioche or potato rolls)
- Condiments and toppings: lettuce, tomato slices, pickles, red onion rings, burger sauce or mayo
Instructions
- Divide 1 pound of ground beef into 4 equal portions (~4 ounces each). Lightly shape each into a loose ball without overworking the meat.
- Preheat a cast iron skillet over medium-high heat for 5 minutes until hot but not smoking.
- Place one beef ball onto the skillet. Using a spatula, firmly press it down into a thin patty about 1/4 inch thick to create a crust and lock in juices. Repeat with remaining balls, cooking 2 at a time if needed.
- Immediately season the patties with kosher salt and freshly ground black pepper.
- Cook patties undisturbed for 2-3 minutes until edges crisp and bottom develops a deep brown crust with juices pooling on top.
- Flip the patties carefully. Add a slice of cheese if desired and cook for another 1-2 minutes for medium doneness.
- While the second side cooks, butter the buns lightly and toast cut-side down in a separate pan or oven until golden and crispy.
- Assemble the cooked patties on toasted buns and add your favorite toppings and condiments.
Notes
Do not press down on patties after the initial smash to avoid squeezing out juices. Dab excess juices gently with a paper towel if pooling too heavily to prevent steaming. Let burgers rest 2-3 minutes off heat before assembling to redistribute juices. Use 80/20 fat ratio beef for best juiciness. Toast buns while patties cook to save time.
Nutrition
- Serving Size: 1 burger with bun an
- Calories: 550
- Sugar: 5
- Sodium: 600
- Fat: 35
- Saturated Fat: 14
- Carbohydrates: 30
- Fiber: 1
- Protein: 35
Keywords: juicy burger, smashed burger, homemade burger, ground chuck brisket blend, easy burger recipe, perfect burger crust