Love this? Save it for later!
Share the inspiration with your friends
“You have to try this chocolate mousse!” my friend texted me one slow Sunday afternoon, right as I was nursing a second cup of coffee and wondering what dessert would actually feel like a treat, not a chore. Honestly, I thought, chocolate mousse seemed fancy but fiddly—like something better left to pastry chefs with their shiny tools and endless patience. But curiosity won, so I made these Decadent Espresso Chocolate Mousse Cups that afternoon, half-expecting the usual flop. Instead, what happened was a surprise: silky, rich, and with just enough espresso to make my taste buds sit up and take notice without turning bitter.
Now, I can’t stop making this recipe—sometimes twice in a week if I’m honest. It’s become my little luxury when I want to feel like dessert didn’t come from a box, but from a kitchen that knows what indulgence really means. The way the mousse melts on your tongue—oh, and the subtle coffee kick! It’s like a quiet, elegant celebration in a cup. This recipe stuck with me because it’s one of those rare desserts that feels both special and doable without a million steps or weird ingredients. So here’s how you can make these luscious espresso chocolate mousse cups yourself, no fuss, just pure, velvety pleasure.
Why You’ll Love This Recipe
Being a bit of a dessert enthusiast who’s tried a fair share of mousse recipes, I can confidently say these Decadent Espresso Chocolate Mousse Cups hit all the right notes. They’re not just another chocolate mousse—here’s why:
- Quick & Easy: This comes together in under 30 minutes, making it perfect for those evenings when you want to impress without spending hours in the kitchen.
- Simple Ingredients: No need to hunt down fancy stuff—just everyday pantry staples like good-quality dark chocolate, eggs, cream, and espresso.
- Perfect for Special Occasions: Whether it’s a date night, a casual dinner party, or just a moment when you want to treat yourself, these cups feel like a mini celebration.
- Crowd-Pleaser: I’ve served this to family, friends, and even coworkers—everyone asks for seconds, no joke.
- Unbelievably Delicious: The texture is so smooth and airy, with a hint of espresso that adds complexity without overpowering the chocolate.
What sets this recipe apart is the balance of flavors and the technique I honed over time—no weird gelatin, no heavy hand with sugar, just a straightforward, luscious mousse. I also find that folding in the whipped cream gently is the secret to that perfect lightness. Honestly, this mousse makes you close your eyes after the first bite, savoring every moment. If you’ve ever wished for a dessert that feels indulgent yet approachable, this recipe has your name on it.
What Ingredients You Will Need
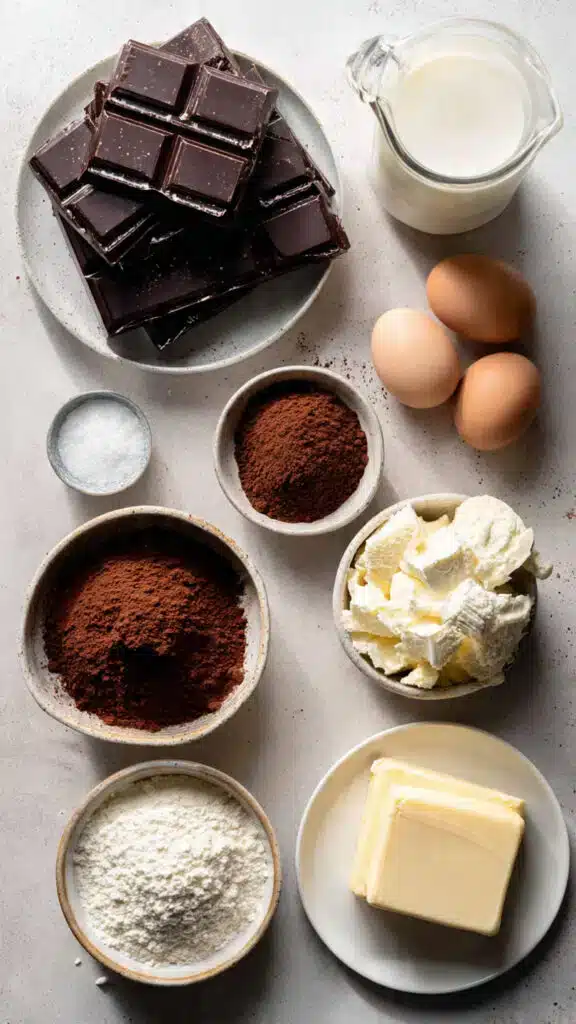
This recipe uses simple, wholesome ingredients to deliver a bold chocolate and espresso flavor with a silky smooth texture. Most are pantry staples, making this dessert easy to throw together anytime.
- Dark Chocolate (70% cocoa or higher): 6 ounces (170 grams), chopped – I recommend using Valrhona for a richer taste, but any good-quality dark chocolate works.
- Espresso: 1/4 cup (60 ml), freshly brewed and cooled – the espresso provides that subtle coffee kick; you can use strong brewed coffee if needed.
- Heavy Cream: 1 cup (240 ml), cold – for whipping into fluffy peaks that lighten the mousse.
- Egg Yolks: 3 large, room temperature – they add richness and help with the mousse’s structure.
- Granulated Sugar: 1/4 cup (50 grams) – balances the bitterness without making it too sweet.
- Vanilla Extract: 1 teaspoon – brings warmth and depth to the flavor.
- Pinch of Salt: Enhances the chocolate’s flavor.
If you want a dairy-free version, swap the heavy cream with coconut cream (chilled and whipped) and use dairy-free dark chocolate. For a gluten-free treat, this recipe is naturally safe, but always double-check your chocolate brand. When fresh espresso isn’t an option, instant espresso powder dissolved in hot water is a fine substitute. I’ve found making the espresso fresh really lifts the whole dessert though.
Equipment Needed
- Mixing Bowls: Two medium-sized bowls, preferably glass or stainless steel for whipping cream and mixing yolks.
- Electric Mixer or Whisk: An electric hand mixer makes whipping the cream a breeze, but a sturdy whisk works if you have patience.
- Heatproof Bowl: For melting chocolate over a double boiler or in the microwave.
- Double Boiler or Microwave: To gently melt the chocolate without burning it.
- Spoons or Spatulas: For folding ingredients together carefully.
- Serving Cups or Glasses: Small dessert cups, ramekins, or even pretty glasses to present your mousse.
If you don’t have a double boiler, placing a heatproof bowl over a pot of simmering water works just fine. I once melted chocolate directly in the microwave in 20-second bursts, stirring in between—it’s a bit riskier but doable if you watch closely. For whipping cream, cold bowls and beaters help it whip faster and fluffier, a trick I’ve learned after many attempts.
Preparation Method
- Melt the chocolate: Place the chopped dark chocolate in a heatproof bowl. Set it over a pot of simmering water (double boiler method) and stir until smooth, about 3-5 minutes. Alternatively, melt in the microwave in 20-second intervals, stirring well each time to avoid scorching. Let it cool slightly but not harden.
- Brew espresso: Prepare 1/4 cup (60 ml) of fresh espresso and set aside to cool completely.
- Whip the cream: In a chilled bowl, whip the heavy cream with an electric mixer until soft peaks form, about 3-4 minutes. Be careful not to overwhip—stop once the cream holds its shape but is still smooth.
- Whisk egg yolks and sugar: In a separate bowl, whisk together 3 large egg yolks and 1/4 cup (50 grams) granulated sugar until the mixture is pale and slightly thickened, about 2-3 minutes. Add 1 teaspoon vanilla extract and a pinch of salt, mixing to combine.
- Combine yolks with espresso: Slowly pour the cooled espresso into the egg yolk mixture, whisking constantly to prevent cooking the eggs. This gives the mousse its signature coffee flavor.
- Incorporate melted chocolate: Gradually fold the cooled melted chocolate into the espresso-egg yolk mixture. Use a spatula to combine gently until smooth and uniform.
- Fold in whipped cream: Carefully fold one-third of the whipped cream into the chocolate mixture to lighten it. Then fold in the remaining cream in two additions, using gentle motions to keep the mousse airy and light.
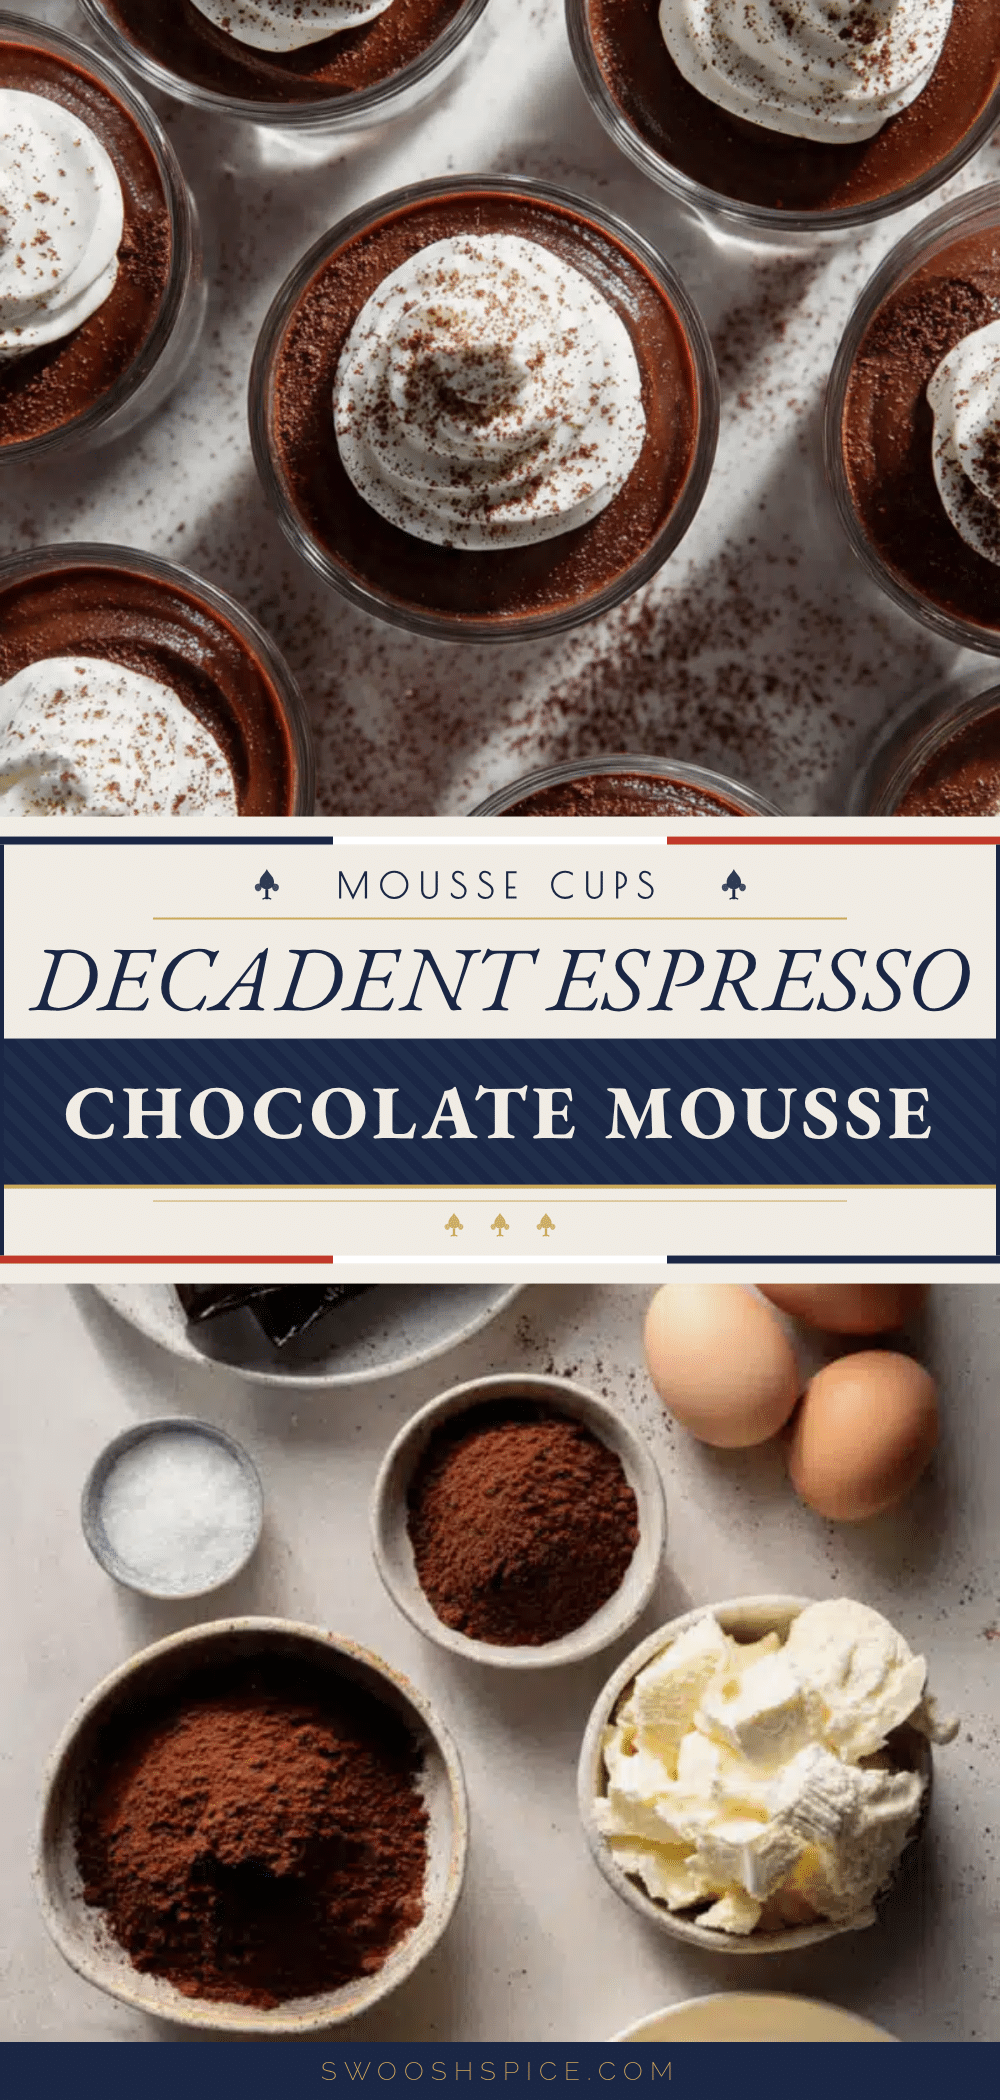
- Chill: Spoon the mousse into serving cups or glasses. Cover with plastic wrap and refrigerate for at least 2 hours, ideally 4 hours, to let the mousse set and flavors meld.
- Serve: Garnish with chocolate shavings, a dusting of cocoa powder, or a few espresso beans for that elegant touch before serving.
If your mousse feels too dense, it probably means the cream or chocolate was too warm during mixing—next time, make sure everything is cool before folding. Also, don’t rush the chilling step; the mousse needs time to develop its signature texture and flavor.
Cooking Tips & Techniques
Making a perfect mousse is all about balance and gentle handling. Here are some tips I picked up, often the hard way:
- Temperature control is key: Melt the chocolate gently and let it cool before mixing. Hot chocolate will scramble your eggs or deflate your whipped cream.
- Whip cream just right: Soft peaks are your friend. Overwhipping turns it grainy, underwhipping makes the mousse flat.
- Fold, don’t stir: Folding keeps the air trapped in the whipped cream, giving mousse its signature lightness. Use a spatula and a gentle motion, scraping along the bowl’s edge.
- Fresh espresso makes a difference: I’ve tried instant espresso powder and brewed coffee, but freshly brewed espresso adds a subtle richness you don’t want to miss.
- Patience pays off: Chill the mousse well. It’s tempting to rush, but it won’t hold its shape or flavor if you skip this step.
Once, I tried rushing the process and ended up with a mousse that was more pudding-like—a tasty pudding, yes, but not the airy mousse I love. So these tips aren’t just theory; they’re lessons learned through a few tasty mistakes.
Variations & Adaptations
Want to mix things up? Here are some creative spins on these espresso chocolate mousse cups:
- Mocha Mousse: Add a tablespoon of cocoa powder along with the espresso for an even deeper chocolate-coffee flavor.
- Vegan Version: Use coconut cream whipped until fluffy and dairy-free dark chocolate. Replace egg yolks with aquafaba (chickpea water) whipped to stiff peaks for a plant-based mousse.
- Spiced Twist: Add a pinch of cinnamon or chili powder to the melted chocolate for a warm, unexpected kick.
- Layered Dessert: Alternate mousse with crushed cookies or a layer of raspberry jam for a fruity contrast, inspired by the texture in chewy raspberry jam oat bars.
- Alcohol Infusion: A splash of coffee liqueur or bourbon adds a grown-up richness, perfect for special occasions.
I personally love the spiced version with a dash of cinnamon—it gives the mousse a cozy vibe, especially in cooler months. You can also experiment with presentation, serving these mousse cups alongside a fresh fruit salad or a crunchy biscuit.
Serving & Storage Suggestions
These mousse cups are best served chilled, straight from the fridge. The texture is luxuriously smooth and light, making each spoonful feel like a little escape. For presentation, I like to add a dusting of cocoa powder or some chocolate curls on top—they make the dessert look so elegant without extra effort.
Pairing the mousse with a crisp cup of espresso or a glass of dessert wine works beautifully, especially if you want to keep the coffee-chocolate theme going. I’ve also found that these mousse cups complement lighter, fresh desserts like the flaky apple turnovers for a balanced finish to a meal.
Store any leftovers in the refrigerator, covered tightly with plastic wrap or in an airtight container. The mousse will keep well for up to 3 days. If you want to prepare ahead, these cups can be made the day before and chilled overnight. To refresh the mousse before serving, let it sit at room temperature for about 10 minutes—you’ll notice the flavors bloom even more.
Nutritional Information & Benefits
Each serving of these espresso chocolate mousse cups offers a rich source of antioxidants from the dark chocolate, which is known for its heart-healthy benefits when enjoyed in moderation. The espresso adds a natural caffeine boost without the calories of sugary coffee drinks.
This recipe contains eggs and dairy, providing protein and essential fats. It’s naturally gluten-free, making it a good option for those avoiding gluten. The sugar content is moderate, and you can adjust it down slightly if you prefer a less sweet dessert.
From a wellness perspective, this mousse feels indulgent but doesn’t weigh you down—it’s a satisfying treat that balances bold flavor with lighter texture. I appreciate having a dessert option that feels like a genuine reward without the heaviness of some creamier, sugar-laden sweets.
Conclusion
These Decadent Espresso Chocolate Mousse Cups are a little masterpiece of flavor and texture—a dessert that feels fancy but is surprisingly simple to make at home. Whether you’re unwinding after a long day or hosting a casual get-together, this mousse offers a moment of pure, soulful indulgence. I love how this recipe lets me play with variations, tailoring it to whatever mood I’m in, but it always delivers that perfect balance of rich chocolate and subtle espresso.
Once you try this recipe, I hope it becomes one of those desserts you reach for whenever you want something special without fuss. And if you do make it, I’d love to hear how you customized your mousse or what moments you paired it with. Sharing those little kitchen stories is what makes cooking so much fun.
Here’s to many cozy, chocolaty moments ahead!
FAQs
Can I make espresso chocolate mousse cups ahead of time?
Yes! In fact, chilling them overnight helps the mousse set perfectly and enhances the flavors. Just keep them covered in the refrigerator.
Is it safe to use raw eggs in this recipe?
This recipe uses raw egg yolks, so it’s best to use fresh, high-quality eggs or pasteurized eggs to reduce any risk. Alternatively, you can try egg substitutes, but texture may vary.
Can I use instant coffee instead of espresso?
You can dissolve a teaspoon of instant espresso powder or strong instant coffee in hot water as a substitute. Freshly brewed espresso has a richer flavor but instant works in a pinch.
How do I know when the whipped cream is ready for folding?
The whipped cream should form soft peaks—when you lift the whisk, the peaks hold but still have a slight droop. Overwhipped cream becomes grainy and harder to fold in smoothly.
Can I freeze these mousse cups?
Freezing is not recommended as it can affect the mousse’s texture, causing it to become grainy or watery upon thawing. It’s best enjoyed fresh or refrigerated for a few days.
Pin This Recipe!
Decadent Espresso Chocolate Mousse Cups

A silky, rich chocolate mousse with a subtle espresso kick, perfect for a luxurious yet easy-to-make dessert.
- Prep Time: 15 minutes
- Cook Time: 5 minutes
- Total Time: 2 hours 20 minutes
- Yield: 6 servings 1x
- Category: Dessert
- Cuisine: French-inspired
Ingredients
- 6 ounces (170 grams) dark chocolate (70% cocoa or higher), chopped
- 1/4 cup (60 ml) freshly brewed espresso, cooled
- 1 cup (240 ml) heavy cream, cold
- 3 large egg yolks, room temperature
- 1/4 cup (50 grams) granulated sugar
- 1 teaspoon vanilla extract
- Pinch of salt
Instructions
- Melt the chocolate: Place the chopped dark chocolate in a heatproof bowl. Set it over a pot of simmering water (double boiler method) and stir until smooth, about 3-5 minutes. Alternatively, melt in the microwave in 20-second intervals, stirring well each time to avoid scorching. Let it cool slightly but not harden.
- Brew espresso: Prepare 1/4 cup (60 ml) of fresh espresso and set aside to cool completely.
- Whip the cream: In a chilled bowl, whip the heavy cream with an electric mixer until soft peaks form, about 3-4 minutes. Be careful not to overwhip—stop once the cream holds its shape but is still smooth.
- Whisk egg yolks and sugar: In a separate bowl, whisk together 3 large egg yolks and 1/4 cup (50 grams) granulated sugar until the mixture is pale and slightly thickened, about 2-3 minutes. Add 1 teaspoon vanilla extract and a pinch of salt, mixing to combine.
- Combine yolks with espresso: Slowly pour the cooled espresso into the egg yolk mixture, whisking constantly to prevent cooking the eggs.
- Incorporate melted chocolate: Gradually fold the cooled melted chocolate into the espresso-egg yolk mixture. Use a spatula to combine gently until smooth and uniform.
- Fold in whipped cream: Carefully fold one-third of the whipped cream into the chocolate mixture to lighten it. Then fold in the remaining cream in two additions, using gentle motions to keep the mousse airy and light.
- Chill: Spoon the mousse into serving cups or glasses. Cover with plastic wrap and refrigerate for at least 2 hours, ideally 4 hours, to let the mousse set and flavors meld.
- Serve: Garnish with chocolate shavings, a dusting of cocoa powder, or a few espresso beans before serving.
Notes
Use fresh, high-quality or pasteurized eggs to reduce risk from raw yolks. For dairy-free, substitute heavy cream with whipped coconut cream and use dairy-free dark chocolate. Instant espresso powder can substitute fresh espresso but fresh is preferred. Chill mousse for at least 2 hours for best texture. Avoid overwhipping cream and folding gently to keep mousse light and airy.
Nutrition
- Serving Size: 1 mousse cup (approx
- Calories: 320
- Sugar: 14
- Sodium: 40
- Fat: 24
- Saturated Fat: 15
- Carbohydrates: 18
- Fiber: 3
- Protein: 5
Keywords: espresso chocolate mousse, chocolate mousse cups, easy chocolate mousse, espresso dessert, homemade mousse, decadent dessert