Love this? Save it for later!
Share the inspiration with your friends
“You have to try this,” my friend texted me late one evening, accompanied by a photo of little rice balls wrapped in nori, each topped with a glossy dollop of creamy tuna mayo. At that moment, I was knee-deep in a chaotic week, juggling work emails and half-cooked dinners. Honestly, my energy was zapped, and the thought of a complicated meal felt impossible. But those creamy tuna mayo onigiri bites looked like the kind of simple comfort that could reset everything.
I gave in, whipped up the recipe that very night, and with every bite, the stress seemed to melt away. The soft, sticky rice paired with the rich, tangy tuna mayo was like a little edible hug. These bites quickly became my go-to snack, perfect for those quiet moments when you just want to slow down and savor something cozy. It’s funny how such a humble snack can turn around a bad day, right?
What really grabbed me was how effortlessly these onigiri bites came together — and how they felt just a bit special without any fuss. No fancy ingredients or hours spent in the kitchen. Just good, comforting flavor that feels like a secret shared between friends.
Now, I find myself making them often, whether it’s for a quick solo snack or a light bite to share during casual get-togethers. And honestly, it’s one of those recipes that sticks around because it’s just so reliably delicious, creamy, and satisfying in the most laid-back way.
Why You’ll Love This Recipe
After making creamy tuna mayo onigiri bites multiple times, I can confidently say they’re a snack worth having in your repertoire. Here’s why:
- Quick & Easy: From start to finish, these onigiri bites take about 20 minutes — perfect for busy evenings or last-minute cravings.
- Simple Ingredients: No special trips to exotic markets needed; the pantry staples you already have form the backbone of this recipe.
- Perfect for Cozy Moments: Whether it’s an afternoon tea break or a late-night nibble, these bites bring a little calm to your routine.
- Crowd-Pleaser: Friends and family alike rave about how creamy and flavorful they are — ideal for casual potlucks or casual snacking.
- Unbelievably Delicious: The creamy texture of the tuna mayo with the slightly tangy rice is pure comfort food, but with a fresh twist.
- What Makes This Recipe Different: Instead of the usual dry tuna, blending mayonnaise with a touch of Japanese Kewpie mayo and a hint of soy sauce gives it a silky smoothness and umami kick. Plus, shaping the onigiri into bite-sized pieces makes them fun and easy to enjoy.
- Emotionally Satisfying: This recipe isn’t just about taste — it’s about those small moments of comfort when you need them most, like curling up with a warm drink and a plate of these little treasures.
Honestly, if you love simple Japanese flavors but don’t want to fuss with complicated sushi rolls, these creamy tuna mayo onigiri bites are going to feel like a revelation.
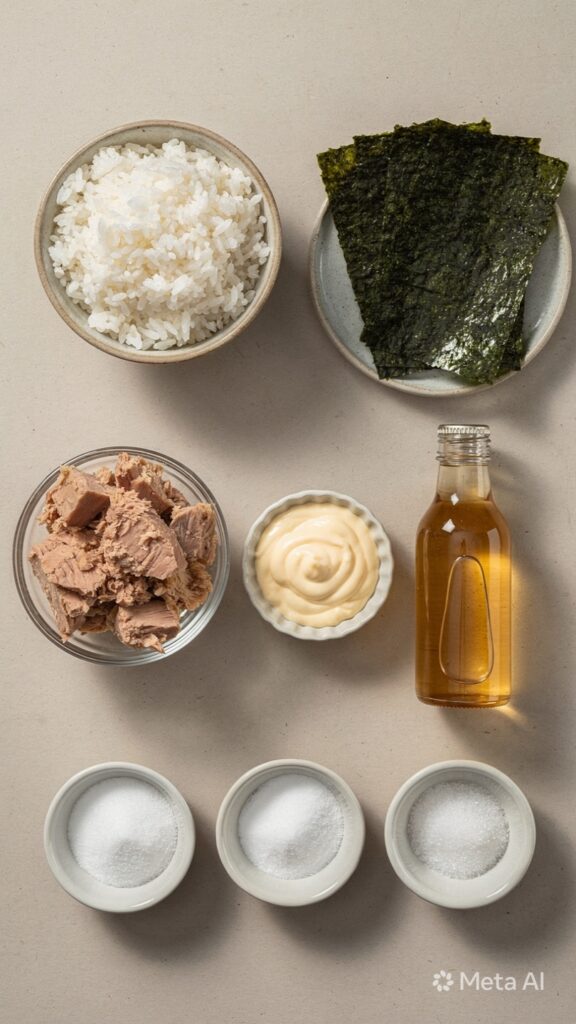
What Ingredients You Will Need
This recipe uses straightforward, wholesome ingredients to create an authentic taste with minimal effort. Most are pantry staples or easy to find at any grocery store.
- For the Rice:
- Short-grain Japanese rice (1 ½ cups / 270g) – essential for that sticky texture
- Water (1 ¾ cups / 415ml) – for cooking the rice just right
- Rice vinegar (2 tbsp) – adds a subtle tang and sheen
- Sugar (1 tsp) – balances the vinegar
- Salt (½ tsp) – seasons the rice perfectly
- For the Tuna Mayo Filling:
- Good-quality canned tuna in water (1 can, about 5 oz / 140g), drained
- Mayonnaise (3 tbsp) – I prefer Japanese Kewpie mayo for its creaminess and umami, but regular mayo works too
- Soy sauce (1 tsp) – just a splash for depth
- Sesame oil (½ tsp) – adds a toasty aroma and richness
- Green onions, finely chopped (1 tbsp) – optional but adds freshness
- Black pepper (a pinch) – for subtle warmth
- For Assembly:
- Nori sheets (1-2 sheets), cut into small strips or squares – the classic seaweed wrap
- Toasted sesame seeds (optional) – for garnish and crunch
If you want to switch things up, you can substitute the tuna with canned salmon or shredded cooked chicken. For a dairy-free version, make sure your mayo is egg-free or use a vegan mayo alternative.
Equipment Needed
- Rice cooker or medium saucepan with lid – a rice cooker makes it foolproof, but a pot works fine if you keep an eye on the water-to-rice ratio.
- Mixing bowls – one for the rice seasoning, another for the tuna mayo filling.
- Sharp knife and cutting board – for chopping green onions and slicing nori.
- Plastic wrap or clean kitchen towel – helps shape the onigiri without sticking to your hands.
- Measuring cups and spoons – accuracy matters for the rice seasoning balance.
If you don’t have a rice cooker, I’ve found that cooking the rice in a heavy-bottomed pot with a tight-fitting lid works well, but you’ll need to avoid lifting the lid too often during cooking to keep the steam even. Also, having a small bowl of water nearby to wet your hands while shaping onigiri makes the process much more manageable and less sticky.
Preparation Method
- Cook the Rice: Rinse the short-grain rice under cold water until the water runs clear (about 3-4 rinses). This removes excess starch and prevents it from being too gummy. Drain well.
- Cook the rice in a rice cooker or pot: Combine rinsed rice and 1 ¾ cups (415ml) water. If using a pot, bring to a boil, then reduce heat to low, cover tightly, and simmer for 15 minutes. Remove from heat and let steam for another 10 minutes with the lid on.
- Prepare the rice seasoning: While rice cooks, mix rice vinegar, sugar, and salt in a small bowl until dissolved. Once rice is done, transfer to a large bowl and gently fold in the vinegar mixture with a wooden spatula or rice paddle. Be careful not to mash the grains. Let it cool to room temperature.
- Make the tuna mayo filling: Drain the canned tuna well to avoid sogginess. In a bowl, combine tuna, mayonnaise, soy sauce, sesame oil, chopped green onions, and a pinch of black pepper. Mix until creamy and well blended. Taste and adjust seasoning if needed.
- Shape the onigiri bites: Wet your hands with water to prevent sticking, then take about 2 tablespoons (30g) of seasoned rice. Flatten it slightly in your palm, place about a teaspoon of tuna mayo filling in the center, and gently mold the rice around it, forming a small ball or triangle. Repeat for all bites.
- Add nori: Wrap each onigiri bite partially with a strip or square of nori, or press a small piece on top as garnish. Optionally, sprinkle toasted sesame seeds for extra flavor and texture.
- Serve or store: These bites are best enjoyed fresh but can be stored in an airtight container in the fridge for up to 24 hours. Let them come to room temperature before eating for the best texture.
Pro tip: When folding the rice with vinegar, be gentle – you want to keep those grains intact for that perfect onigiri bite. Also, if you find your tuna mayo too runny, refrigerate it for 10 minutes before assembling, making it easier to handle.
Cooking Tips & Techniques
Making creamy tuna mayo onigiri bites is pretty straightforward, but a few tricks can make your experience smoother and your bites tastier.
- Rice Texture Matters: Using Japanese short-grain rice is key. It’s sticky enough to hold shape but not mushy. If you only have medium-grain rice, rinse it well and be extra careful with water amounts.
- Season the Rice While Warm: The vinegar mixture absorbs better when rice is warm, creating that signature subtle tang and shine. But let it cool before shaping, or you’ll have sticky fingers!
- Handle Tuna Filling Gently: Overmixing canned tuna can make it mushy. Fold ingredients just until combined to keep a pleasant texture.
- Wet Your Hands: This little habit is a game-changer — dipping your palms in water between shaping stops the rice from clinging to your skin.
- Don’t Overstuff: Too much filling can make the onigiri unstable. Keep it to about a teaspoon per bite for perfect balance.
- Get Creative with Nori: If you like, toast the nori strips quickly over a low flame for a crispier texture and deeper flavor.
- Multitasking: While the rice cooks and seasons, prep your filling and nori strips to save time. This way, assembly is quick and enjoyable.
I remember the first time I tried to make these, I packed the filling too generously, and the onigiri kept falling apart. Lesson learned — a light hand is best, especially when you’re just starting out. Also, if you prefer a little heat, adding a tiny pinch of shichimi togarashi into the tuna mayo gives a lovely kick without overpowering the creamy balance.
Variations & Adaptations
If you want to switch things up or cater to different tastes, these creamy tuna mayo onigiri bites are quite versatile.
- Spicy Tuna Mayo: Add sriracha or Japanese chili mayo to the tuna mixture for a spicy twist. This version pairs beautifully with a cold green tea.
- Avocado Tuna: Stir in small chunks of ripe avocado for extra creaminess and a fresh, buttery flavor. This is one of my favorite adaptations when I want something a bit lighter.
- Vegetarian Option: Replace tuna with mashed chickpeas or edamame blended with mayo and soy sauce to keep the creamy texture without seafood.
- Brown Rice Onigiri: Use brown short-grain rice for a nuttier flavor and more fiber, though the texture will be a bit less sticky.
- Baked Onigiri: After shaping, brush lightly with soy sauce and bake at 400°F (200°C) for 10 minutes for crispy, flavorful bites reminiscent of yaki onigiri.
Personally, I tried the spicy version during a chilly evening, and it was the perfect cozy snack paired with a bowl of creamy chicken Florentine soup. The heat from the tuna bites complemented the mellow soup beautifully.
Serving & Storage Suggestions
These creamy tuna mayo onigiri bites are best served at room temperature, allowing the rice to be soft and the filling creamy without being cold or hard.
- Serving: Arrange on a pretty platter with extra nori strips and a sprinkle of toasted sesame seeds. Pair with pickled ginger or a small side of soy sauce for dipping.
- Complementary Dishes: These bites go wonderfully with simple miso soup or a fresh cucumber salad for a light meal or snack. They’re also great with a refreshing iced green tea or a sparkling yuzu soda.
- Storage: Store in an airtight container in the refrigerator for up to 24 hours. Avoid longer storage as the rice texture can harden and nori can become soggy.
- Reheating: To enjoy later, gently steam or microwave briefly (about 20 seconds) covered with a damp paper towel to bring back softness. Let it cool slightly before eating.
- Flavor Development: The tuna mayo filling tends to meld flavors overnight, making leftovers surprisingly tasty — just keep the nori separate if you want to avoid sogginess.
For a simple snack setup, these bites also pair well with light finger foods like the crispy asparagus and goat cheese tart, balancing creamy textures with fresh, crisp bites.
Nutritional Information & Benefits
Each creamy tuna mayo onigiri bite provides a modest calorie count (about 80-100 calories per piece), making them a light, satisfying snack option.
- Protein: Tuna offers lean protein, supporting muscle repair and energy levels.
- Healthy Fats: The mayonnaise and sesame oil add heart-healthy fats in moderation, contributing to satiety and flavor.
- Carbohydrates: Rice provides quick energy, with short-grain rice giving a balanced glycemic response.
- Vitamins & Minerals: Green onions add small amounts of vitamin K and antioxidants, while nori contributes iodine and minerals important for thyroid health.
- Dietary Considerations: This recipe is gluten-free if you use gluten-free soy sauce, which makes it suitable for many dietary needs.
- Potential Allergens: Contains fish (tuna) and egg (mayonnaise), so be mindful of those with allergies.
From a wellness perspective, these bites strike a nice balance between indulgence and nourishment — creamy and comforting without being heavy or greasy.
Conclusion
Creamy tuna mayo onigiri bites are one of those easy, satisfying snacks you’ll find yourself reaching for time and again. They’re simple to make, require few ingredients, and deliver a comforting flavor that feels both familiar and a little special.
Whether you tweak the filling to suit your taste or keep it classic, these bites offer that cozy Japanese snack experience without any of the fuss. I love how they turn a rushed evening into a moment of calm and enjoyment — that’s why they’ve become a staple in my kitchen.
Give them a try, play around with the flavors, and let me know how you make them your own. I’d love to hear your adaptations or snack-time stories!
Frequently Asked Questions
Can I use canned salmon instead of tuna in this recipe?
Absolutely! Canned salmon works well and offers a slightly different flavor profile while keeping the creamy texture intact.
Is it necessary to use Japanese short-grain rice?
Japanese short-grain rice is best for stickiness and texture, but medium-grain rice can be used if rinsed thoroughly and cooked carefully, though the texture may vary.
How long can I store these onigiri bites?
Store them in an airtight container in the fridge for up to 24 hours. For best texture, enjoy them the same day if possible.
Can I make these vegan or vegetarian?
Yes! Substitute tuna with mashed chickpeas or edamame and use vegan mayo to keep the creamy consistency without animal products.
What’s the best way to reheat onigiri without drying them out?
Reheat gently in the microwave covered with a damp paper towel or steam briefly. This keeps the rice soft and the filling creamy.
Pin This Recipe!
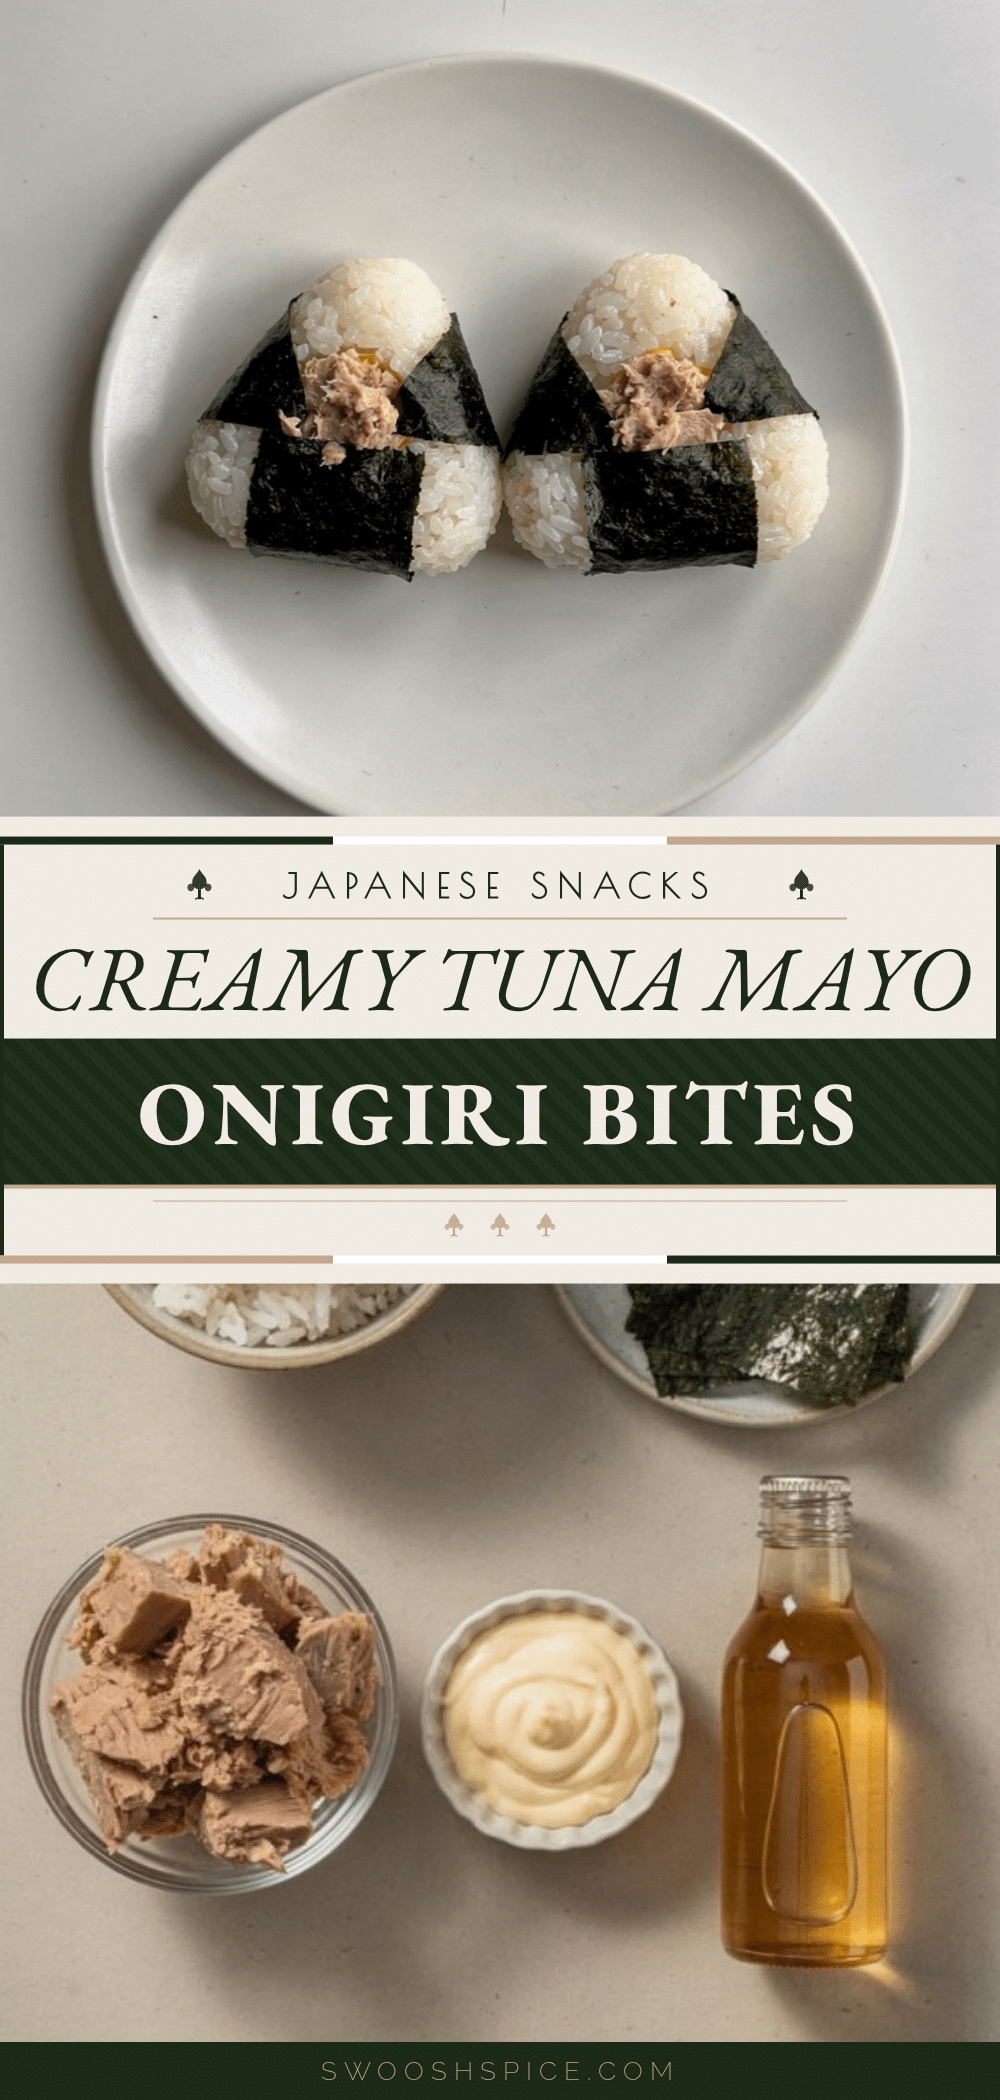
Creamy Tuna Mayo Onigiri Bites Easy Homemade Japanese Snack Recipe
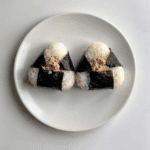
These creamy tuna mayo onigiri bites are a quick and easy Japanese snack featuring sticky short-grain rice filled with a rich, tangy tuna mayo mixture, wrapped in nori. Perfect for cozy moments or casual gatherings, they offer comforting flavor with minimal fuss.
- Prep Time: 10 minutes
- Cook Time: 15 minutes
- Total Time: 25 minutes
- Yield: 12-15 bites 1x
- Category: Snack
- Cuisine: Japanese
Ingredients
- 1 ½ cups (270g) short-grain Japanese rice
- 1 ¾ cups (415ml) water
- 2 tbsp rice vinegar
- 1 tsp sugar
- ½ tsp salt
- 1 can (5 oz / 140g) good-quality canned tuna in water, drained
- 3 tbsp mayonnaise (preferably Japanese Kewpie mayo)
- 1 tsp soy sauce
- ½ tsp sesame oil
- 1 tbsp finely chopped green onions (optional)
- A pinch of black pepper
- 1–2 nori sheets, cut into small strips or squares
- Toasted sesame seeds (optional)
Instructions
- Rinse the short-grain rice under cold water until the water runs clear (about 3-4 rinses). Drain well.
- Cook the rice with 1 ¾ cups (415ml) water in a rice cooker or pot. If using a pot, bring to a boil, then reduce heat to low, cover tightly, and simmer for 15 minutes. Remove from heat and let steam for another 10 minutes with the lid on.
- While rice cooks, mix rice vinegar, sugar, and salt in a small bowl until dissolved.
- Transfer cooked rice to a large bowl and gently fold in the vinegar mixture with a wooden spatula or rice paddle. Be careful not to mash the grains. Let it cool to room temperature.
- Drain the canned tuna well. In a bowl, combine tuna, mayonnaise, soy sauce, sesame oil, chopped green onions, and black pepper. Mix until creamy and well blended. Adjust seasoning if needed.
- Wet your hands with water to prevent sticking. Take about 2 tablespoons (30g) of seasoned rice, flatten it slightly in your palm, place about a teaspoon of tuna mayo filling in the center, and gently mold the rice around it to form a small ball or triangle. Repeat for all bites.
- Wrap each onigiri bite partially with a strip or square of nori, or press a small piece on top as garnish. Optionally, sprinkle toasted sesame seeds for extra flavor and texture.
- Serve immediately or store in an airtight container in the refrigerator for up to 24 hours. Let come to room temperature before eating for best texture.
Notes
Use Japanese short-grain rice for best stickiness. Wet hands with water when shaping to prevent rice from sticking. Refrigerate tuna mayo filling if too runny before assembling. Store onigiri in airtight container and consume within 24 hours for best texture. Reheat gently covered with damp paper towel to keep rice soft. Optional variations include spicy tuna mayo, avocado tuna, vegetarian versions with mashed chickpeas or edamame, and baked onigiri.
Nutrition
- Serving Size: 1 onigiri bite (abou
- Calories: 90
- Sugar: 1
- Sodium: 210
- Fat: 5
- Saturated Fat: 1
- Carbohydrates: 8
- Fiber: 0.5
- Protein: 4
Keywords: onigiri, tuna mayo, Japanese snack, creamy tuna, rice balls, nori, easy snack, homemade onigiri, quick Japanese recipe